Returning to Sport Post-Abdominal Surgery Series: Understanding Anatomy to Build a Stronger Athlete3/21/2021 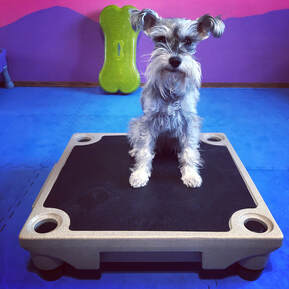 Rainey looking real cute! Rainey looking real cute!
Today marks day 69 post-abdominal surgery for Rainey, and tomorrow is the start of week 10. Last week Rainey did agility Thursday and Sunday. We did not exercise those days, or on either of the Mondays at the start and end of the week. This allowed for a recovery period, which is important for muscle healing and regeneration, even in dogs. They can do normal dog things, like go for a walk or play with house mates, but doing exercise day after day after day is just too much for them. Unlike humans, a dog won’t stop. It is up to the human to stop the dog. A dog does not know what is in their best interest. Ask every dog who ever went face deep into a porcupine. They didn’t know better, therefore ended up with a face full of quills.
Rainey did not demonstrate any extra soreness or tiredness from her extra days of agility. The seminar we attended contained a lot of running, which she hasn’t done in a while. She was tired Sunday evening, but by Monday she was energized again. This coming weekend we are running in a UKI agility trial. I will take each run and each day as they come, assessing what will be best for her. If she appears to be enthusiastic by end of day, we will keep running. If she is tired and over-aroused like a child who needs a nap, we won’t run. Simple as that.
This week’s topic is going to focus on anatomy. Earlier this week I saw a social media post of a dog backing up stairs. It was a larger breed dog and it was only 2 stairs, so not that bad. What was bad was the dogs head position. Its head was cranked up over his shoulders, as the reward placement was at a height that was convenient for the handler, not what was best for the dog. At the same time, the dog was being asked to lift its hind end at an angle while backing up stairs. However, from its head placement, it was shifting the majority of its weight to its hind end, which makes it much more difficult to appropriately lift the hind legs. Not to mention the stress this head placement was putting on the dogs cervical-thoracic junction. The handler was receiving all sorts of likes and comments on how wonderful this was. I had to move on. It was hard for me to watch that video without wanting to comment that this was actually harmful for the dog, for several reasons. Backing up is a difficult task. Backing up stairs is an extremely difficult task. Backing up stairs with your head held high is nearly impossible and will create pain at the transition zones of the spine if continued frequently.
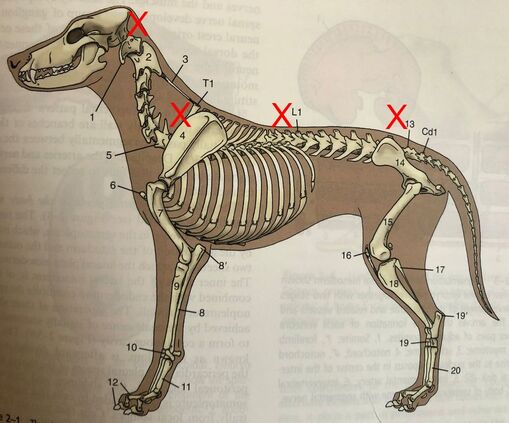
But what are transition zones of the spine? These are areas where one type of vertebrae is changing to fit to the next type. The sections include: occiput to cervical, cervical to thoracic, thoracic to lumbar, and lumbar to sacral. In dogs there are 7 cervical vertebrae, 13 thoracic, 7 lumbar, 3 sacral (which are fused to form the sacrum), and 20 caudal or coccygeal vertebrae, depending on breed and tail docking.
The occiput to cervical region is at the base of the skull, and isn’t commonly thought of as a transition zone, as its not a location where a disc can be herniated. There are actually no intervertebral discs at C1, C2, or the coccygeal vertebrae. An intervertebral disc is a fibrocartilaginous structure consisting of a soft center (nucleus pulposus) and surrounded by concentric layers of dense fibrous tissue (anulus fibrosus). They are the shock absorber during physical activity. The intervertebral disc is what we think of when we say ‘the dog herniated a disc’ aka the disc is protruding from its location between vertebral bodies and putting pressure on the spinal cord, resulting in inflammation and pain. The disc space is what we look at on radiographs when assessing for back health, aside from spondylosis and other arthritic indicators. When a disc becomes unhealthy or a traumatic injury occurs, the disc space narrows as the disc protrudes out of the space and into the spinal canal, resulting in inflammation, pain, and possibly neurological dysfunction.
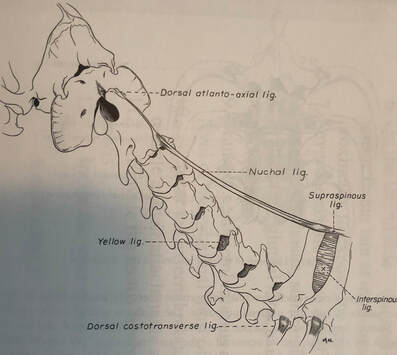
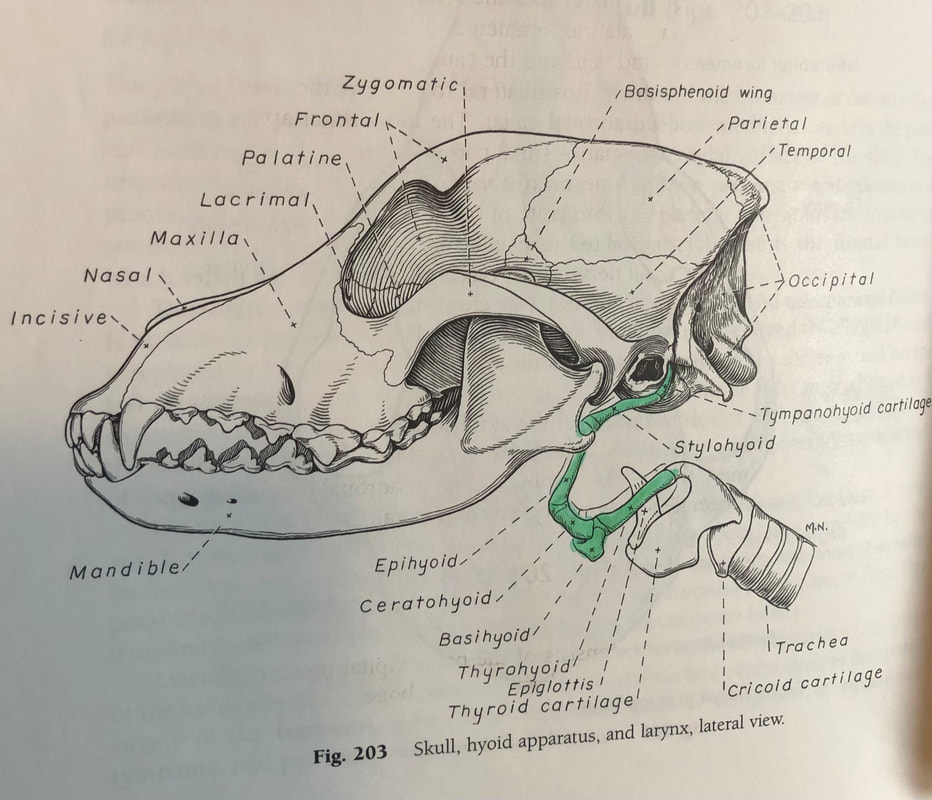
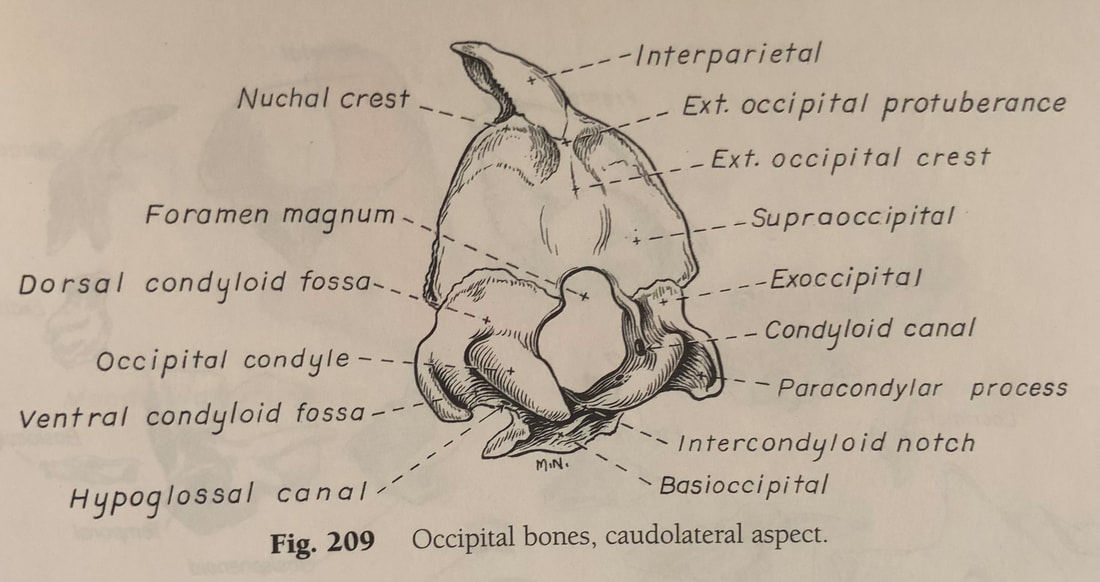
The Occipital, C1, and C2 region is the location that can become very stiff when a dog is always heeling on one side of a handler (ie always looking up with their head turned to the side). The occipital protuberance is the large bulge on the back of the head. Most prominent in breeds such as setters. The occipital condyle is at the lower portion of the occiput, and it articulates with the atlas to form the atlanto-occipital joint. The main movement of this joint is flexion and extension. The wings of the atlas are the bulges on the side of the neck closest to the head that you can feel. Cervical vertebrae 1 (C1) is the atlas. C2 is the axis. The atlanto-axial joint is responsible for rotary (left and right) motion of the head. There is a lot more going on here, but we will keep it simple. The axis, as seen in the photo with just the cervical spine, has an elongated ridgelike dorsal spinous process and has characteristics different than other vertebrae.
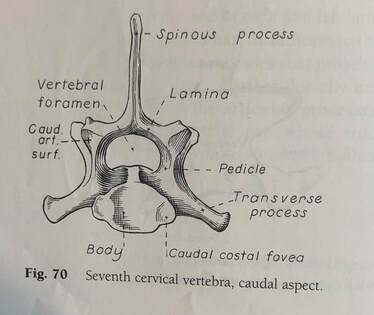
As we move down the spine, and visible on the photo of the cervical spine is the cervical thoracic junction. There is a lot to be said about the thoracic vertebrae. Mostly, each thoracic vertebra has a corresponding rib and as you move down the thoracic vertebra the shape of the bones change as they transition to the lumbar spine. At the C7-T1 junction, you will note that C7 has the highest dorsal spinous process (the bone pointing upward) of all the cervical vertebrae. This is so it starts to match the upcoming thoracic vertebrae. However, they are not perfect fits. This brings forth the issue with the transition zones. Note – not to be confused with transitional vertebrae, which are congenital anomalies of deformed vertebrae. Transition zones are weak by nature. You cannot expect two opposing bones to fit perfectly, but the body tries very hard to make the perfect match. Because they are not perfect and they are changing from one type to another they are weak areas in the back. The 3 remaining zones (cervical thoracic, thoracolumbar, and lumbosacral) are the points in the back to most commonly suffer injury. This is due to what has previously been mentioned, and the simple fact that they are weak zones. That is just nature. Yes, a disc can herniate at another location, but these are the 3 most common locations.
Back to the cervical thoracic junction. Not only is this region at risk for herniation, it is extremely protected and therefore extremely difficult to properly assess. What puts this region at risk of injury? The previously mentioned backing up the stairs with head held high or any activity that puts the neck in a high, hyperflexed position, especially if a concussive action (landing) is to follow. In the simplest of ways to think about this, think of holding a grape between the left pointer finger and the right pointer finger. There are a few positions that you can do that keep the grape (disc) stable and happy. But if you look at the adjacent photo of C7 from behind (caudal, so looking tail to head through the spinal canal), then the lateral (side) view of the cervical and T2 photo with scapula removed, and then the side photo of the dog skeleton, you will see how sharp the angle is from C7 (marked with a 5 in the full dog photo) to T1. Remember, the spinal cord is ABOVE the disc space. Now, use your imagination and picture what is actually happening to the joint space and disc space of C7-T1 when you ask a dog to hike its head up while its rear is going up. It’s not pretty and it sounds pretty painful, even without a disc herniation. And now you can imagine how a disc herniation could happen at this location. This is why I stress A NEUTRAL NECK!!! A neutral neck is a neck that is in alignment with the spine while you are performing an activity. When the dog is performing front feet on floor and back feet on a thing their head position is an elongation of their back. It is NOT hiked up creating a sharp angle from neck to thorax. Now you understand why. Physics, my friends, physics. Oh, and anatomy. Think of how dogs move and how their bones move. It will help you create a better exercise program for them and prevent injuries. An injury to the C7-T1 junction is subtle. Like I mentioned, this area is deeply hidden under lots of muscle and the scapula. Due to the brachial plexus being in this region, a sign of a C7-T1 injury may be front limb lameness. It may also be reluctance to lift their head. Or it could be spasms when that region is palpated. If this disc space ever has to be surgically relieved, I have heard it is extremely difficult to access. I can only imagine.
As we move down the thoracic vertebral column, you will notice that the dorsal spinous processes decrease in height slightly, but remain pointing towards the tail (caudal), giving you the sloping appearance from shoulder to back. Once you reach T7 or 8, the spines become progressively shorter, and when at T9 or 10 they are at their shortest point. At T11, the dorsal spinous process is nearly pointing straight up. In a lean fit dog, you will notice a dip in their back at this point. This is called the anticlinal region. T12 and T13 continue to change direction of their dorsal spinous process, pointing toward the head (cranial).
As we enter the lumbar vertebrae, they dorsal spinous process continue to point forward and the bodies of the lumbar vertebrae are longer than that of the thoracic vertebrae. The lumbar vertebrae also have transverse processes projecting of their sides and pointing toward the head. L1 has minimal transverse processes, and as the lumbar vertebrae go on, the transverse process gets larger. The transverse processes serve as attachment sites for the epaxial muscles of the back. The articulation (joints) of the last portion of the thoracic and lumbar vertebrae allows for flexion and extension of this section, but limits lateral motion. This brings us to the thoracolumbar junction, which is one of the most common regions for disc herniation. Based on the previously mentioned anatomy, you can imagine that this area is not as strong at other regions of the thoracic or lumbar spine simply due to all the boney changes in this region. If you look at your dog, you will also note that in this region there are fewer muscles. The C7-T1 region is well protected with muscle. But the T13-L1 region does not have that degree of stabilization. Therefore, if your dog is being asked to be extreme tasks, such as tight turns for a region of the spine not necessarily meant to bend laterally, abrupt landing where there may be extreme flexion at the T-L junction, or even a small dog being picked up by their mid-section, this area will become broken down much faster if it does not have the support of a strong core and strong back musculature. Again, think physics with anatomy. 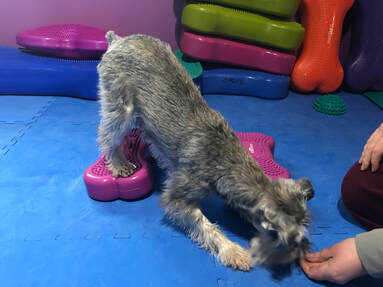 Rainey demonstrating proper form with a neutral neck & straight back. Rainey demonstrating proper form with a neutral neck & straight back.
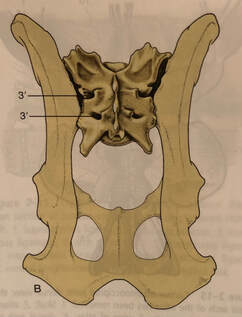
As we move down the back, we come to the lumbosacral region. It is important to note that at L6-7 the spinal cord comes to an end, therefore leaving unprotected nerves in the canal. Since there are still discs between the vertebral bones of L6-sacrum, this means when a disc herniates in this region it is applying pressure directly to nerves, not the nerves protected by the spinal cord. This is why dysfunctions in this region are extremely painful. The sacrum, as previously mentioned, is 3 bones fused together, and the bones is located between the ilium of the pelvis, which it articulates with. The disc space between L7 and the sacrum is the largest space and the highest motion joint space of the spine. As such, this location is predisposed to injury. This is the location, along with the T-L junction, that is most at risk when a dog goes butt over head (think an uncontrolled A frame, or even a stopped A frame).
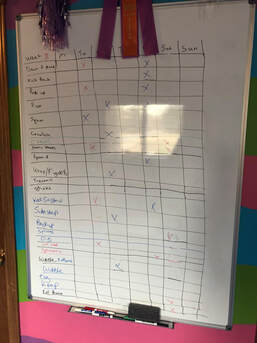
This has been a fairly brief overview of the 3 major transition zones of the spinal column. I hope it has provided you with useful information on why we do the things we do – why form is so important with exercises, and how building muscle appropriately can help keep these zones intact, aiding in a long, healthy career for your dog. I realize this topic should have been covered sooner in this blog series, as it would have provided better understanding when I described Rainey’s exercises. But, from reading this I hope you can understand the difficulty in organizing this information. I’ll admit, I was dreading it. There is so much more that can be described on these 3 transition zones – muscles attachments, articular facets and rotation, exercises to stabilize and strengthen, etc. But my hope is you will look through the videos of Rainey’s exercises and see that I have already taught you the importance of proper form and function. Now you understand the WHY!!! Days 63 to 69 – Continuing to Build Strength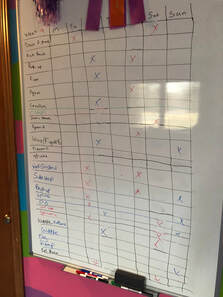 This weeks exercise schedule. This weeks exercise schedule.
Squats – this an a very difficult exercise that strengthens the gluteal muscles and hip flexors, as well as the large muscle groups of the hind end. I used the Cloud as a way to ‘roll’ Rainey into a sit, while keeping her front legs elevated. Then she slowly and controlled, pushes herself upwards to a stand, with all feet remaining stationary. Like I said, this is very difficult, but also very rewarding, as it is great for strengthening.
Rocking Sit to Stand with Elevation – the purpose of changing up the Rocking Sit to Stand is to work her muscles a little differently. It does take away the power component, and maybe once she’s more practiced at this form she will regain a power drive from the rear. This attempt was her first and she’s still trying to figure it out. A couple critiques – try to maintain a straight back in the stand position. We weren’t the best, but tried for it. Second – to lure her into a sit I did have to have her head/neck a little too extended for my liking, noted especially after watching the video. Therefore, a better start for this would have been have dog sit on the balance pad and stand to the FitBone. This goes to show that videoing is very helpful. Plyometric Jump Progress – everything seems to be paying off, as Rainey is now able to make the jump about 3 or 4 times her height from a sit! She isn’t clawing her way up the Peanut, instead she is powering from her rear and landing on the top of it. She looks good! The set up is 1 KLIMB with the tiny legs, 1 KLIMB with no legs, and an upside down KLIMB. Wobble Board/FitBone/KLIMB – I wanted to share an updated version of this exercise, paying more attention her form. Note in this video the lure is held lower, which is making the position of her front legs and elbows less stressed. I try to maintain a neutral neck. I am also moving the wobble board in various directions for her to keep the stimulus novel. She does a great job stabilizing and maintaining her form. Diagonal Leg Lift Core & Strength Assessment – Rainey continues to have a strong core and excellent core engagement! If I were not adding this to blog videos, I likely would only assess this once every few weeks or once a month. Despite having this done weekly, Rainey still does not appreciate it. From her side profile, Rainey still looks great! There is not much new to report. Hopefully before the week 12 post she will get groomed, which will aid in demonstrating her fitness.
I continue to be very happy and proud of Rainey’s improvement and progress! She continues to get better every week! This is week 10 of Rainey’s recovery process. That means I have 2 more weeks of blogs left. Next week we will return to an agility trial, and I am not sure I will have time to write a large post. It will possibly just be a summary of her trial experience back from recovery and COVID. She has not participated in a trial since October 2020. In the remaining two posts, I will discuss warm-ups and cool-downs, along with Tui-na massage, which is a large part of my dog’s warm-up program.
The road to recovery is long, and sometimes there are setbacks, but the time it takes to get there will always be worth it! Take care and may the Qi flow freely for you! Dr. Shantel Julius, DVM, CCRP, CVA, fCoAC, CVSMT, CVFT, CVTP, CVCH, CTCVMP References: Millis, D., Levine, D. Canine Rehabilitation and Physical Therapy, 2nd Edition. Elsevier. 2014. Evans, H.E., deLahunta, A. Guide to the Dissection of the Dog, 6th Edition. Saunders. 2004. Dyce, K.M., Sack, W.O., Wensing, C.J.G. Textbook of Veterinary Anatomy, 4th Edition. Saunders Elsevier. 2010.
0 Comments
 Rainey Star Rainey Star
Today marks day 62 post-abdominal surgery for Rainey, making this the start of week 9. Rainey returned to jumping 12 inches this week, and also ran in a seminar today. In class this week, Rainey had no difficulty with 12 inches, along with running all contacts and weaves. She also maintained no issues the following days. Each week it seems her confidence has improved. When started back at class some of her previous over-arousal issues showed themselves – excessive barking, grabbing at me, being very ‘sticky’ and lacking independence. As we have progressed in our physical rehab and slowly moved her back up to 12 inches it seems her strength is fair greater than it’s been in a very long time, possibly ever, and her confidence is reaching new heights. Rainey has always been barky when she runs. She instructs me on whether I am too slow or simply providing her incorrect cues. She’s very opinionated. I suppose that’s why I picked her. This week the structure of the post will be a little different. I will cover the 3 exercises in the video, and then I will do a discussion about how I can tell from a functional standpoint that Rainey is much, much better than she once was.
 This weeks exercises This weeks exercises
Jump-Crawl – this is yet another more advanced exercise demonstrating power and speed in action. As you can see in the video, I have the bars set above 12 inches for her to jump. The goal of this exercise is to engage the hind end and core through the crawl, then immediately power through to a jump. When they return after the jump, the dog jumps and collects into a crawl. Then repeats. This exercise can only be performed when the dog has appropriate whole-body strength, especially the core and back end. Rainey has not seen this exercise in over 2 years, and since we had been doing so much crawl work lately, she was initially confused and tried to crawl under the jump set.
Ramp – slow, controlled incline work is a great way to build muscle and engage important stabilizers. This exercise also mimics the muscles needed for the incline and decline work needed for the dog walk, teeter, and A frame. When performed in a controlled manner you can engage the muscles utilized for those pieces of equipment to a more thorough capacity. As you can see Rainey sometimes prefers to crouch when she does things. It can be a struggle to get her to fully stand upright, especially on the incline/decline. Therefore, patience is needed and just like everything else, it’s a work in progress. Back up Incline – this is complex and difficulty. Rainey’s little brain may have exploded a little bit. Therefore, I wasn’t extremely picky in what I was asking her to do. It is very difficult to back up that height of an incline, but she managed to do it. When I repeat this, I will make sure the KLIMB is pressed against the wall, therefore the target FitBone will not move. However, as I have learned in the past, being close to a wall will sometimes encourage Rainey to perform a hand stand. As funny or cute as this is, I really try to discourage it, alongside her offered attempts at a sit pretty. The reason is so much can go wrong with those two activities/tricks. It puts an extreme amount of pressure on the lumbosacral region of the spine. Only dogs with extreme core and back strength should perform those. If she offers them every once in a while, that is totally fine. But under no circumstances do I encourage it, especially not at this stage in her recovery. 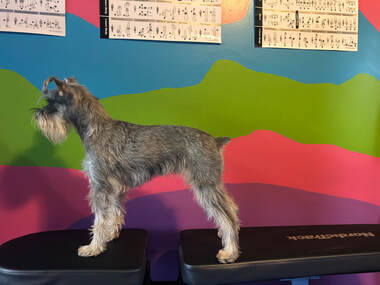 Rainey looking good! Rainey looking good!
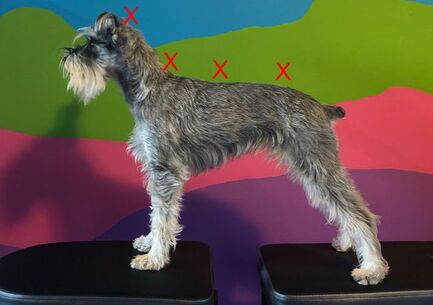
Diagonal Leg Lift Core & Strength Assessment – this week I put a traction mat on the KLIMB. I recently ordered one, and I really like it. The KLIMB isn’t extremely slippery, but for things like this it can be, especially when the dog has excess fur on their feet. Rainey continues to have a strong core and excellent core engagement. Her side profile stacked photo continues to show a nice topline and she happily and willingly self-stacks herself. This is really important – she willingly puts herself in a stacked position. Why this is important is it means she is free of pain in her rear end, her groin, and her back. If she was standing with her legs camped under her or not stacking out nicely I would be concerned that she was sore. I note Rainey standing like this naturally any time she is standing, and that is an excellent sign of her comfort. Another sign of a sore hind end or groin is the dog bunny hops when it’s trotting or running. Or it has a pacing gait – left front and right hind come together at a trot vs left front and left hind. This is a sign that something is wrong and the dog should be assessed. Therefore, 3 things for you to monitor in your dog’s recovery – is the dog stacking out willingly, does the dog bunny hop at a faster gait, and does the dog have a pacing gait (when it’s not a breed who should).
Form to Function – All the hard work is paying of
The next portion of the attached video is of Rainey running in a seminar today. It is snippets put together of the complete course from the 2 different sessions she had, a total of a 54 second run. The sessions were 8 minutes and 6 minutes split between 10 dogs throughout 3 hours. That clarification is so you recognize I was not over working her. On that note, I was concerned that repeating the sequence on the second attempt would be too much for her, but in the end, I do not think it was. I say this because she ran it with the same speed and intensity she ran the first attempt. It was a very tough international handling course, and neither of use had ran that level for a while. This was also the first time Rainey has seen a full-sized course since October.
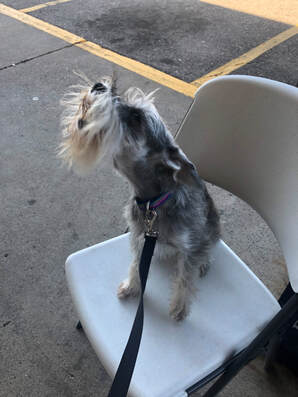 Rainey being Rainey, waiting her turn at Scent Work Rainey being Rainey, waiting her turn at Scent Work
What I want you to appreciate is Rainey’s speed, jump ability, and extension on the flat (flat out running). Where I noticed her extension and overall confidence was her speed over the dog walk. Now if you fast forward to the second video snippet on this video, you will see an AKC agility trial run from October 17th, 2020. This was 5 months ago. As I have stated previously, Rainey had barely received any strength and conditioning in the last year. Watching this second video I can definitely see that. Despite this being a Qualifying run at 4.261 yps (8.72 mph), which earned her 28 MACH points (as in 28 seconds under standard course time), Rainey’s extension while running is not that great, and neither is her jump quality. Again, most notable over the dog walk. Comparing the 2 videos, her DW time is 2.6 secs today (also a missed contact, oops) and 2.9 secs in October. That may not seem like a big difference, but 0.03 seconds can be the difference in winning or losing (of course she needs to actually hit the yellow, but that’s not my point right now). If you watch her head during these runs it may give you a better idea of what I am looking at. In the AKC video, she is doing what I call the schnauzer bop. She’s running like a little rocking horse, and is super cute. This is what most mini schnauzers look like when they run. My first agility dog Pyper always looked like this. And I’ve noticed for the last 6 months or more both Rainey and Aurora look like this more and more. She’s fast, yes, but not as fast as she could be and definitely not as efficient either. When we compare her running from today to the October video, there is a lot less bopping and a lot more full stride running (extension). Then when we compare her jump form from the two videos, she is jumping more efficiently in extension than she has in a very long time. In the snippet included I would like her take off (where she starts to jump) and landing to be a little more equal. However, she still looks much better, and we have not started actually working on her jump form, only her muscles. Therefore, these changes occurred naturally with her increased conditioning and athleticism. A discussion on jump style could go much further, but for now I wanted to point out the improvements in her functionality that were noted by her trainer and myself today. This is extremely promising for her career. Aside from being faster, if she is more efficient and carries herself better that can translate into a longer, healthy (injury free) career.
I continue to be very happy and proud of her improvement and progress! I hope that despite not including any data or literature you have learned something new from reading this. Today provided some real-life experience on why things matter and why we recommend what we do for our sport dogs. I still intend to expand on Tui-na massage, as well as provide a more in-depth lesson on anatomy. I hope to keep coming up with new exercises and helpful information for you!
The road to recovery is long, and sometimes there are setbacks, but the time it takes to get there will always be worth it! Take care and may the Qi flow freely for you! Dr. Shantel Julius, DVM, CCRP, CVA, fCoAC, CVSMT, CVFT, CVTP, CVCH, CTCVMP 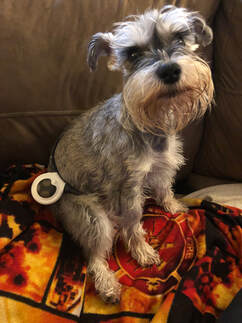 Rainey sporting her Loop Rainey sporting her Loop
Today is day 55 post-abdominal surgery, which makes tomorrow the start of week 8. This week in class Rainey jumped 10 inches, and we left behind caution and ran! There is no bad news to report, as she ran as swift and accurate as she ever as! Maybe the only negative is she’s extremely fast right now! Her weaves are like she never left them! Fast, accurate, and distance! Her A Frame is actually slightly better than before, with her hitting the contact zone more accurately. Overall, she hasn’t missed a step when it comes to her favorite sport!
This week we are going to discuss the Assisi Loop! Assisi Loop, Clinica Bed, and the Loop Lounge are developed from the same technology targeted Pulsed Electromagnetic Field therapy to tPEMF. Assisi products are a non-invasive, non-pharmaceutical healing device that utilizes low-level pulses of energy, reducing pain and swelling, while accelerating healing. PEMF products have been an FDA-cleared medical device since the 1970’s, and the first knowledge about electromagnetic induction was in 1800! It was in the 1950’s that scientists dived deeper into the technology of PEMF. In 1970 Arthur A. Pilla, PhD developed a low-powered PEMF device that was later approved by the FDA for the healing of nonunion bone fractures, noting that PEMF signals could be adjusted to target bones and increase their healing in non-healing fractures. In 1998 PEMF was approved for use in urinary incontinence and muscle stimulation by the FDA.
How Assisi technology is different than the other brands available is it uses a specifically tuned microcurrent to deliver its patented tPEMF™ to damaged cells, triggering an animal’s own natural anti-inflammatory process. The electromagnetic signal that Assisi uses is one-one-thousandth the strength of a cell phone. This signal simulates cellular repair by enhancing the binding of calcium with calmodulin, which in turn accelerates the body’s production of nitric oxide. Nitric oxide has several beneficial effects on wound healing, including its influence on angiogenesis, inflammation, cell proliferation, matrix deposition, and remodeling. Therefore, the Assisi product uses microcurrents to stimulate the body to heal ITSELF by stimulating nitric oxide production. The Assisi tPEMF™ signal is the only purposely designed PEMF product to deliver the largest effective dose of electromagnetic signal to the nitric oxide signaling pathway. In general, the benefits of tPEMF™ are plenty, and include increased blood flow to tissue site, enhanced muscle function, increased bone healing, blood oxygenation, decreased inflammation and pain, and accelerated recovery post-surgery or injury. Assisi products can be used for nearly any injury or recovery. In my practice, the most common injury I use them for is neck injuries. They are extremely easy to apply, as you can just place the Loop through the dog’s neck. They wear it like a necklace while their 15-minute treatment takes place, and then it automatically shuts off. Post-op ACL surgeries are also a fabulous use for Loops. Not only will they speed bone healing, but they will help with the soft tissue repair and healing as well. 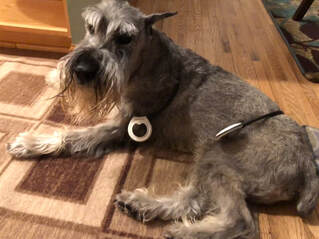 Stone the Standard Schnauzer sporting 2 Loops Stone the Standard Schnauzer sporting 2 Loops
The treatment schedule for a Loop depends on the injury, but typically it is recommended to apply the product every 2.5 to 3 hours for the first week. This will allow the body time to respond and recover, as well as the battery on the Loop to recharge. As the injury becomes less severe, the frequency of treatments can become less. Typically, after week 1 or 2, frequency can be decreased to 2-3 times per day. Once the patient is in maintenance mode and no longer in acute pain, treatments can be once daily or 2-3 times per week. For best results, it’s ideal to maintain once daily for chronic issues. If your pet has multiple areas of pain or discomfort, you can either use two Loops or a Loop Lounge, which is their bed. A few years when I had my standard schnauzer Stone, despite being an old man, I could not, for the life of me, get him to lay still for 15 minutes on my Assisi Clinica Bed. Instead, I used two Loops – one around his neck and one around his pelvis. Another fact about the Loop – the PEMF is emitted 10 inches on either side of the device. It cones out, like a football, therefore it is not a 10-inch square rectangle, but instead a cylinder type appearance. This worked great for Stone, and for Rainey it encompasses almost her entire body! Each Loop costs $299 and lasts for 150 uses. This breaks down to $1.99 per use, or $9.95 per day for acute injuries when you are applying every 3 hours during waking hours. Honestly, there is not much that you can get for that cost and that efficacy. Other common uses for a Loop are laminitis in horses, wound repair, urinary incontinence, soft tissue strain, abdominal surgery, oral surgery (unlike laser a Loop is safe around the eyes), certain cancers, etc. Honestly, the list goes on. Aside from its plentiful uses, the other reason I love the Loop is it is something owners can do at home. Not only does it give owners some control over their pet’s care, but they can see the changes and benefits directly.
Day 49 to 55 – Continuing to Build Skills & Muscle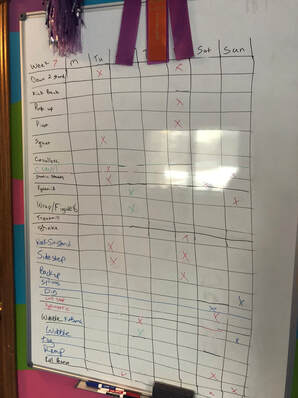 This weeks exercise plans This weeks exercise plans
As we progress in our agility training, I continue to keep things interesting in the exercise training. This week was very hectic for me, and I wanted to badly to skip a day. Life gets busy and things get placed on the back burner. But I knew I had this blog to write, and I knew I had to post a photo of our exercise board. If there were multiple days missed, I would have been very disappointed in myself. Plus, I owe it to Rainey and the other dogs to keep them in shape if I want to continue asking so much out of them physically, ie agility and scent work. In my earlier blog posts, I laid out the physical demands of our chosen sports. My dogs did not choose these sports, but they do love to do them. Would they be happy terrorizing our cats as a full-time job? Yes, I’m pretty sure they would. But our cats wouldn’t be happy. So, agility and scent work it is! If I want them to have a long, healthy career I need to do my best at keeping them healthy and in shape to perform. Someday, when I’m not rushing to write this blog at 7 pm I will go into an anatomy review and discuss how important muscles and their attachments to bones are. It is so important! Maybe week 12, or 13….For now, take my word for it that to keep your dog performing longer you MUST keep them in peak physical condition with a combination of proper diet, exercise, and supplements.
This week’s exercises revisited the old, tweaked them some, challenged Rainey some, and expanded onto some new things!
Down to Stand on a Decline – to keep things interesting I decided to add a small 4-inch incline using the FitPaws balance board and a KLIMB. The incline wasn’t extreme, but I am sure she noticed a difference! Using an incline/decline will engage muscles slightly differently and possibly engage ones that are typically not used for this exercise. This decline wasn’t so severe that she was fighting for grip on her rear end, but it was enough for her to notice. Sit to Stand to Sit on a Decline – repeat about what I said above, with the addition that since she was going to a full sit to down the decline was a bit more noticeable for her. However, she rocked it like the champ she is! Sprint to a Tug – this week on social media I saw some friends performing exercises with their puppies, and I thought to myself ‘why can’t we revisit puppy things and make it fun for fitness?’ So, we did! Please take note that the tug is NOT up. I repeat – DO NOT TUG YOUR DOG UP! You always want to tug the dog with a neutral neck in alignment with their spine. Combining the sprint and tug exercise gets two bangs for one buck. You are practicing speed and stopping, with a rapid change to tugging, which allows for rapid muscle engagement changes. Teaching muscles and joints to do new things under control is the best way to prevent injury! If they have seen it before they may be prepared for it when it happens unexpectedly on the course. Lateral Side Steps on Overinflated Twin Disc – as you can see from watching this, it requires a large amount of core strength to stabilize on the disc while walking left to right with her front feet on the ground. Make sure to keep the dogs back as straight and neck neutral as possible. Slow and controlled movements will result in optimal muscle engagement! 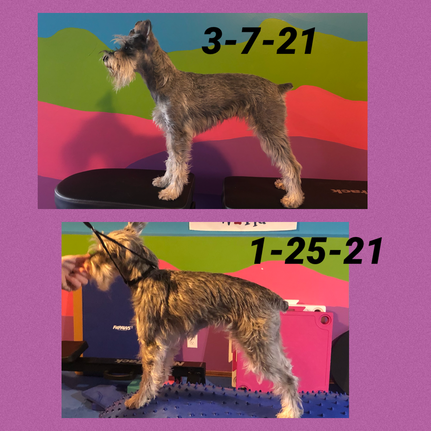
Digging – this was an accidently trick/exercise. I was continuing to work on shake when we hit a wall. I was using the pod for her to foot target to when she started scratching at it. Then I thought well, why not teach digging! Digging is truly a full body exercise! If you watch the video, once she gets going with both feet her shoulders are engaged and working hard, her core is working to stabilize her back and body, and her rear end is in engaged holding her still. The thing you cannot easily appreciate is how well digging works to strengthen the flexor and extensor tendons of the front limbs! What are those, you ask! Those are tendons that allow their tiny legs and digits to remain upright. They work against each other to maintain proper balance and structure. Keeping these strong and flexible, but not overworked, is important for maintain the proper motion and function of the limbs (back legs have them too, and they are worked during things like tug when they dig their feet into the ground). Also, think of an agility dog (or any dog that runs and turns quickly). Their toes literally grip into the ground as they turn. This comment can totally take me down the rabbit hole of dew claws. Research has proven in recent years that dogs actually use their dewclaws to in turning. They are not just there to be an annoyance factor. They serve a purpose, and it’d be best if they were left attached to puppies. Digging can turn out to be a great exercise in a controlled environment!
Peanut Roll & Jump – I finally found a use for the Cloud! I use it for a read end strengthening and power exercise for my minis. It’s the perfect size for them. The idea of this exercise is similar to what you saw in the pyramid exercise or elevated stands – weight is shifted to the rear and the head is slowly turned side to side to shift weight from left rear to right rear, giving small engagements to different core muscles. Then the dog faces center and from a stand still launches over the object. If a dog was too weak to perform this exercise, they would likely need to take 1 to 2 steps on top of the Cloud as they pass over. As you can see in the video, Rainey barely touches the Cloud as she passes over. Back Up Over Cavaletti – what you are seeing here is the very beginnings of an exercise for Rainey. Her antics are almost comical as she tries to back up, hitting the cone. The point of this exercise is to teach further foot awareness on all limbs, as well as work the joints at different heights/flexion/extension while backing up. This provides a new/novel stimulus for the dog. Again, introducing something new in a controlled environment in hopes that when they see something similar in rear life their body can respond appropriately. 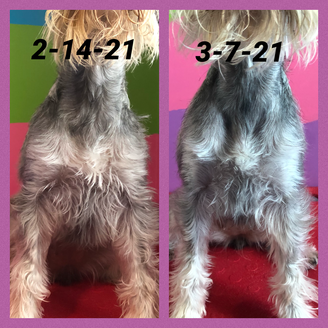
As I wrap up this week’s post, I want to take a minute to point out Rainey’s progress. The photo listed here is a chest comparison from today to 3 weeks ago on 2-14-2021. I hope you can appreciate how much muscle Rainey has put on in just 3 weeks’ time, simply due to a focused, targeted strength training program! Her chest is not as hallow and her neck and shoulders are slightly thicker. Her side profile is also greatly improved in the accompanying photo showing today from 6 weeks prior, which was 2 weeks post-op. Look how much you can accomplish with your dog if you take just 10 minutes a day 4-5 days per week! It is so worth it to see these changes!
Rainey continues to build power, speed, and strength! This week she will move back up to her regular jump height of 12 inches, and in a few weeks, we return to the competition ring. I couldn’t be happier with her progress! I hope anyone reading this has learned a little along the way. I intend to expand on Tui-na massage and a more in-depth lesson on anatomy and why things matter or why we recommend what we do for our sport dogs. We have 5 more blog posts, as I promised a 12-week series. Hopefully I can keep coming up with new exercises and helpful information for you! The road to recovery is long, and sometimes there are setbacks, but the time it takes to get there will always be worth it! Take care and may the Qi flow freely for you! Dr. Shantel Julius, DVM, CCRP, CVA, fCoAC, CVSMT, CVFT, CVTP, CVCH, CTCVMP References: https://assisianimalhealth.com/technology/ |
AuthorDr. Shantel Julius, DVM Archives
April 2021
Categories |

 RSS Feed